Zone 6 is a wonderfully practical place to grow vegetables, but it is less forgiving than Zone 7 if you start late or buy the wrong things first. The season is long enough for tomatoes, peppers, beans, cucumbers, squash, basil, potatoes, garlic, carrots, greens, and a serious fall planting. It is also short enough that peppers can stall, melons can run out of time, and a surprise frost can erase a month of optimism.
Most Zone 6 gardeners are working with a real winter, a spring that warms unevenly, a useful but not endless summer, and a fall window that rewards planning. In many Zone 6 areas, the last frost falls somewhere from late April into mid May, and the first frost can arrive from late September into mid October. That is broad on purpose. Elevation, cold-air drainage, lake influence, city heat, and local weather patterns matter more than the zone label once you are choosing planting dates.
Use your ZIP in the Plant by ZIP matcher and the planting calendar for local timing. Zone 6 on the USDA Plant Hardiness Zone Map means an average annual extreme minimum around -10 to 0 degrees F. That tells you winter survival. It does not tell you your last frost date, summer heat, rainfall, soil drainage, or pest pressure.
Disclosure: Some product links in this article are affiliate links, which means Plant by ZIP may earn a commission if you buy through them at no extra cost to you.
1. Start with one bed you can manage
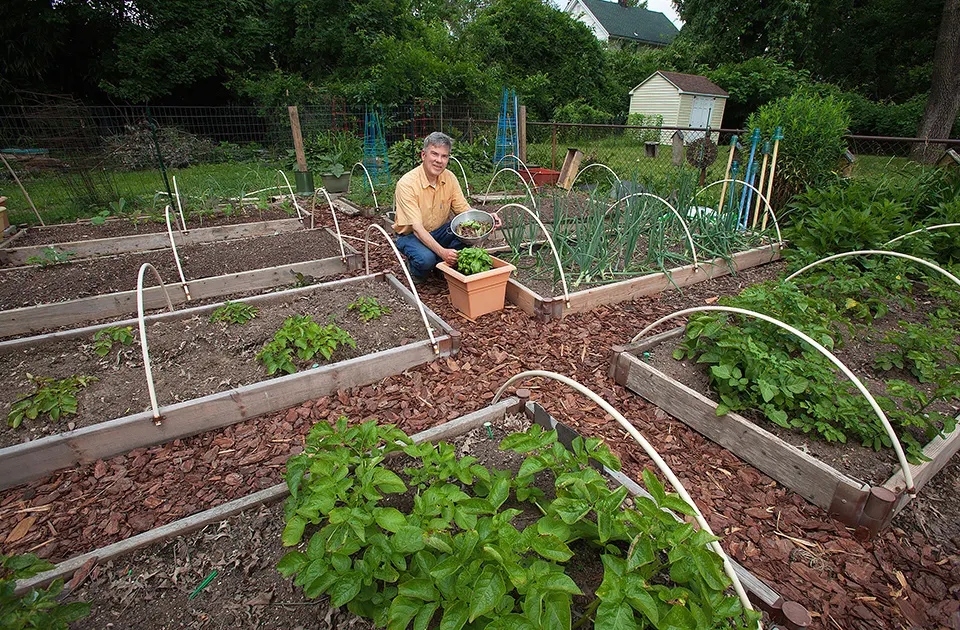
For a first Zone 6 vegetable garden, one 4x8 raised bed is enough. It gives you room for a tomato, a pepper, basil, greens, beans, carrots, cucumbers on a trellis, and a fall crop after the early lettuce or peas are finished. More beds are tempting, but Zone 6 timing asks for attention. It is better to water, cover, weed, and replant one excellent bed than to neglect four half-built ones.
A galvanized raised bed kit is usually the simplest durable choice. It goes together quickly, handles freeze-thaw cycles well, and keeps a clean edge around paths. A cedar raised bed kit is warmer-looking, easier to sit on, and fits a cottage or kitchen-garden style. Both are good. Pick the one you will actually install before spring planting season gets away from you.
If the bed is going over lawn, do not overcomplicate the first day. Mow low, water the area, overlap plain cardboard by several inches, and fill the bed on top. If you have aggressive perennial weeds or grass creeping in from the edges, use geotextile landscape fabric under paths and around the bed perimeter. Do not bury fabric halfway through the growing soil. Vegetable roots need depth, and fabric inside the soil profile becomes a future headache.
For fill, bulk raised-bed mix from a local supplier is usually the best value. If bags are the practical option, a raised-bed soil blend can form the main fill, with compost amendment mixed into the top few inches. Keep one small potting mix bag around for containers, seedling up-potting, and patching low spots. Avoid filling the bed with straight compost, straight topsoil, or cheap mulch sold as garden soil.
The small tool that matters most in Zone 6 is a soil thermometer. Air temperature can feel like spring while the soil is still cold enough to slow beans, cucumbers, squash, basil, tomatoes, and peppers. A basic soil thermometer is plenty. A digital soil thermometer is faster if you like quick readings. For warm-season crops, wait for consistently warm soil, not one pretty afternoon.
2. Seeds and starts that fit Zone 6 timing
Zone 6 rewards a split strategy: direct-sow the fast crops and buy or start transplants for the slow warm-season crops. Peas, lettuce, spinach, radishes, carrots, beets, beans, cucumbers, summer squash, and many greens are straightforward from seed. Tomatoes, peppers, eggplant, broccoli, cabbage, cauliflower, and early herbs are easier when you start with sturdy transplants.
A broad vegetable seed variety pack can be useful as a pantry, but do not let a seed bundle design the garden for you. Zone 6 has enough season for variety, but not enough time for every novelty to get a fair trial. Start with crops that give fast feedback and real meals.
For a first bed, choose one dependable tomato such as Amish Paste tomato, Roma tomato, or Sungold tomato if you want cherry tomatoes. Add a pepper such as Jalapeno pepper or California Wonder pepper. Put Marketmore 76 cucumber on a trellis, direct-sow Blue Lake bush bean or Provider bush bean after the soil warms, and use Black Beauty zucchini only if you have room.
The cool-season lineup is where Zone 6 shines. Plant Bloomsdale spinach, Parris Island romaine lettuce, Lacinato kale, Red Russian kale, Sugar Snap pea, Danvers carrot, and Detroit beet early. Save brassicas like Snowball cauliflower for spring transplants or, often better, a late-summer start for fall harvest.
If you start seeds indoors, buy a simple system once. A seed-starting tray with a humidity dome works for a small garden. An integrated seed-starting kit with dome and lights is cleaner if you want fewer decisions. Take the dome off as soon as most seeds germinate. Seedlings need airflow, not a permanent terrarium.
For peppers, eggplant, tomatoes, and basil, a seedling heat mat is worth owning. For lettuce, spinach, kale, broccoli, and many cool-season crops, heat can make seedlings weak. Use warmth to germinate warm-season trays, then move seedlings under light.
Good light is non-negotiable. A set of Barrina T5 grow light fixtures mounted close above the seedlings will beat a sunny window in most Zone 6 homes. Run lights 14 to 16 hours a day. Start peppers earlier than tomatoes, tomatoes about 6 to 8 weeks before transplanting, and cucumbers or squash only 3 to 4 weeks before transplanting if you start them indoors at all.
3. Water before summer gets serious
Zone 6 gardeners sometimes underestimate watering because spring rain does so much work. Then July arrives, tomatoes are flowering, cucumbers are sizing up, lettuce is gone, and the bed dries faster than expected. The time to install irrigation is before that happens.
For one raised bed, a complete drip irrigation starter kit is the easiest entry point. Run two or three lines down the bed, pin them in place, and mulch over the soil once seedlings are established. Drip keeps leaves drier, reduces wasted water, and makes it easier to grow tomatoes and cucumbers without dramatic swings between dry and soaked soil.
Do not skip the spigot parts. A backflow preventer, Y-filter for drip systems, and pressure regulator protect the system from the failures that make people hate drip. Add a hose-end battery timer once plants are established. Start conservatively, then dig down with your fingers to see whether water is reaching the root zone.
Mulch matters in Zone 6 because soil can swing from cold and wet in spring to hot and dry in summer. Straw, shredded leaves, or another clean organic mulch helps hold moisture and keeps soil from crusting. Wait until the soil warms before mulching heat-loving crops heavily. Mulch too early and you can keep a cold bed cold.
For a deeper setup, use the full drip irrigation guide. The exact hardware is less important than the habit: steady root-zone moisture through flowering, fruit fill, and dry spells.
4. Frost protection is not optional
In Zone 6, frost protection is not a fancy season-extension hobby. It is basic insurance. You need it in spring for newly planted seedlings and in fall when greens can keep producing after the first light frost.
The first item to buy is a roll of Agribon AG-19 frost cloth or a similar lightweight row cover. It protects young plants from wind, light frost, and some early insect pressure while still letting light and water through. Use low tunnel hoops so the fabric floats above the crop instead of pressing leaves flat. Secure the edges with garden Velcro clips, clamps, boards, or soil.
Row cover is especially useful for lettuce, spinach, kale, brassicas, carrots, beets, and hardening-off transplants. It is not a license to plant tomatoes into cold mud. Warm-season crops still need warm soil and settled weather. Use protection to survive a cold snap, not to pretend your climate moved south.
A small cold frame is optional but valuable if you want more from spring and fall. In Zone 6, a cold frame can protect spinach, lettuce, parsley, mache, kale, and overwintered starts. Vent it on sunny days. Cold frames can overheat shockingly fast, even when the air outside still feels chilly.
Think of the Zone 6 year as three waves: early cool-season planting, frost-free summer crops, and a planned fall garden. The fall wave is not leftover gardening. It is often the best greens season of the year.
5. Tools that earn their spot
You do not need a matching tool wall. You need tools you will reach for every week.
A hori hori knife is the most useful first hand tool. It plants transplants, cuts roots, opens soil bags, measures depth, digs weeds, and handles awkward jobs without complaint. Add a sturdy hand trowel for transplanting and a hand cultivator for loosening crust, mixing light amendments, and catching weeds when they are still tiny.
For pruning, buy one decent pair instead of three bad pairs. Felco pruners are repairable and comfortable, which matters once tomatoes, peppers, herbs, and trellised cucumbers need regular attention. Clean cuts also reduce plant damage in wet springs and humid summers.
Use gloves you will actually wear. Nitrile-coated garden gloves are better for vegetable work than thick leather gloves because you can feel seedlings, clips, seed packets, and drip fittings. A harvest basket or garden colander is useful once beans, cucumbers, herbs, and tomatoes start coming in.
Skip the fancy extras at first: decorative seed boxes, cheap moisture meters, tiny greenhouse cabinets, broadforks for a single raised bed, and complicated pruning tools. Buy them later if your garden grows into them.
6. Pest and disease kit for Zone 6
Zone 6 pest pressure varies wildly by region, but the basic beginner kit is small. You want prevention first and targeted treatment second.
Use insect netting or lightweight row cover over young brassicas, carrots, beets, and cucurbits before pests arrive. Physical exclusion is cleaner than chasing damage later. Remove covers from crops that need pollination when flowers open, or hand-pollinate under cover if needed.
For caterpillars on cabbage-family crops, Bt for caterpillars is the most useful first spray. It targets caterpillars rather than acting like a broad insecticide. Apply in the evening and repeat after rain when active feeding is visible.
For aphids, mites, and some soft-bodied pests, neem oil can help, but use it carefully. Spray in the evening, avoid open flowers, and do not spray heat-stressed plants. Diatomaceous earth is optional and works best when dry, which limits its usefulness in damp spring weather.
Disease prevention is mostly spacing, airflow, mulch, and watering at the base. Do not crowd tomatoes because the tag says they fit. In Zone 6, a compact garden still needs enough airflow to dry leaves after rain and dew. The garden pest management guide covers the decision tree in more detail.
Optional but useful
A soil test kit can help you learn pH and basic nutrient patterns, but a county extension lab test is usually better before major amendments. Zone 6 soils range from acidic woodland loam to heavy clay to dry western mineral soil. Test before adding lime, sulfur, or a heavy fertilizer routine.
Composting is worth doing if you have space. An outdoor compost tumbler can handle kitchen scraps and small garden waste in a tidy way. A countertop electric composter is more of a food-waste reducer than a full compost system, but it can make sense where outdoor composting is not practical.
A garden journal or planner is more useful than it sounds. Write down when you started peppers, when the last frost actually hit, when beans germinated, when the first cucumber beetles showed up, and when you pulled the last tomato. Zone 6 success improves quickly when you stop relying on memory.
The Zone 6 buying order
Buy in this order if you are starting from zero.
First, the bed, soil, compost, mulch, and soil thermometer. Second, seeds and starts, plus a seed-starting setup if you are starting indoors. Third, drip irrigation before summer heat arrives. Fourth, frost cloth, hoops, and clips before spring transplants or fall greens need them. Fifth, hand tools. Sixth, pest supplies as the relevant pressure appears.
That order keeps the garden practical. The bed and timing make the harvest possible. Water and protection keep it steady. Tools and pest controls support the system instead of distracting from it.
Bottom line
A good Zone 6 vegetable garden is built around timing. Start cool-season crops early, give warm-season crops a real head start, protect the shoulder seasons, water consistently, and plan a fall garden before summer is over.
One well-run raised bed can teach you more than a cart full of products. Grow reliable crops first, take notes, and let the second year be shaped by what actually happened in your yard.
Hero image: Peggy Greb, USDA Agricultural Research Service, image D4540-1, public domain.